July 18, 2012

My First Mixed Media Canvas

the summer days are in full swing here in sunny Florida  and i'm feeling the full brunt being super preggo. our swimming pool is a god-send the floating takes off the added weight i'm now carrying, helps with the swelling and the anxiety of the next thing.... birth.
one thing that i can't seem to get enough of is fruit salad any kind really whatever fruits are available & fresh - just up the road from us is the most amazing street market and that's my favorite place to buy our fruits & veggies - they even carry organic. this is my favorite salad so far

the perfect fruit salad for pregnant or not pregnant individuals
1/2 of a ripe cantaloupe
bunch: strawberries
1 nectarine
1 peach
handful: blueberries
handful: blackberries
1/2 pint: raspberries
as many as you like: red & white grapes
1/2 of a pineapple
couple tablespoons of flaked coconut
mix all-together lightly sprinkle with raspberries & flaked coconut
CAN'T. GET. ENOUGH!

with the baby shower just around the corner my focus has been registering & finishing touches on the nursery there is much to do yet - but 1/2 of it isn't really 'necessary' as my husband calls it.. its just cosmetic.. ya know pretty things so when i'm up all wee hours of the night & morning i can have something pretty to look at & enjoy.. besides my gorgeous new son of course! 

anyhow part of that decor was a mixed media canvas - my 1st to be exact and i'm very happy with the way it turned out - if i do say so myself!

living next to a nature preserve we always see owls & wild life - last night is was a family of deer (the dog was going nuts!) so i like to think of this canvas as our back yard when we're out celebrating... and i look out the window as the party is dying down and see one of those perfect messy moments when everything is just where it should even though its not

the fence is made of chipboard which i painted & crackled, added rub-ons & of course that little die-cut owl which i built up with foam dots & molding paste  

the background is a many layer of gesso, molding paste, about 8 different  paints & 2 or 3 mists, but all that alpha texture was create with a template & molding paste

the banner is paper which i mod-podged on

pearl mist in turquoise - the tree is a cricut die-cut + a pet a loo branch

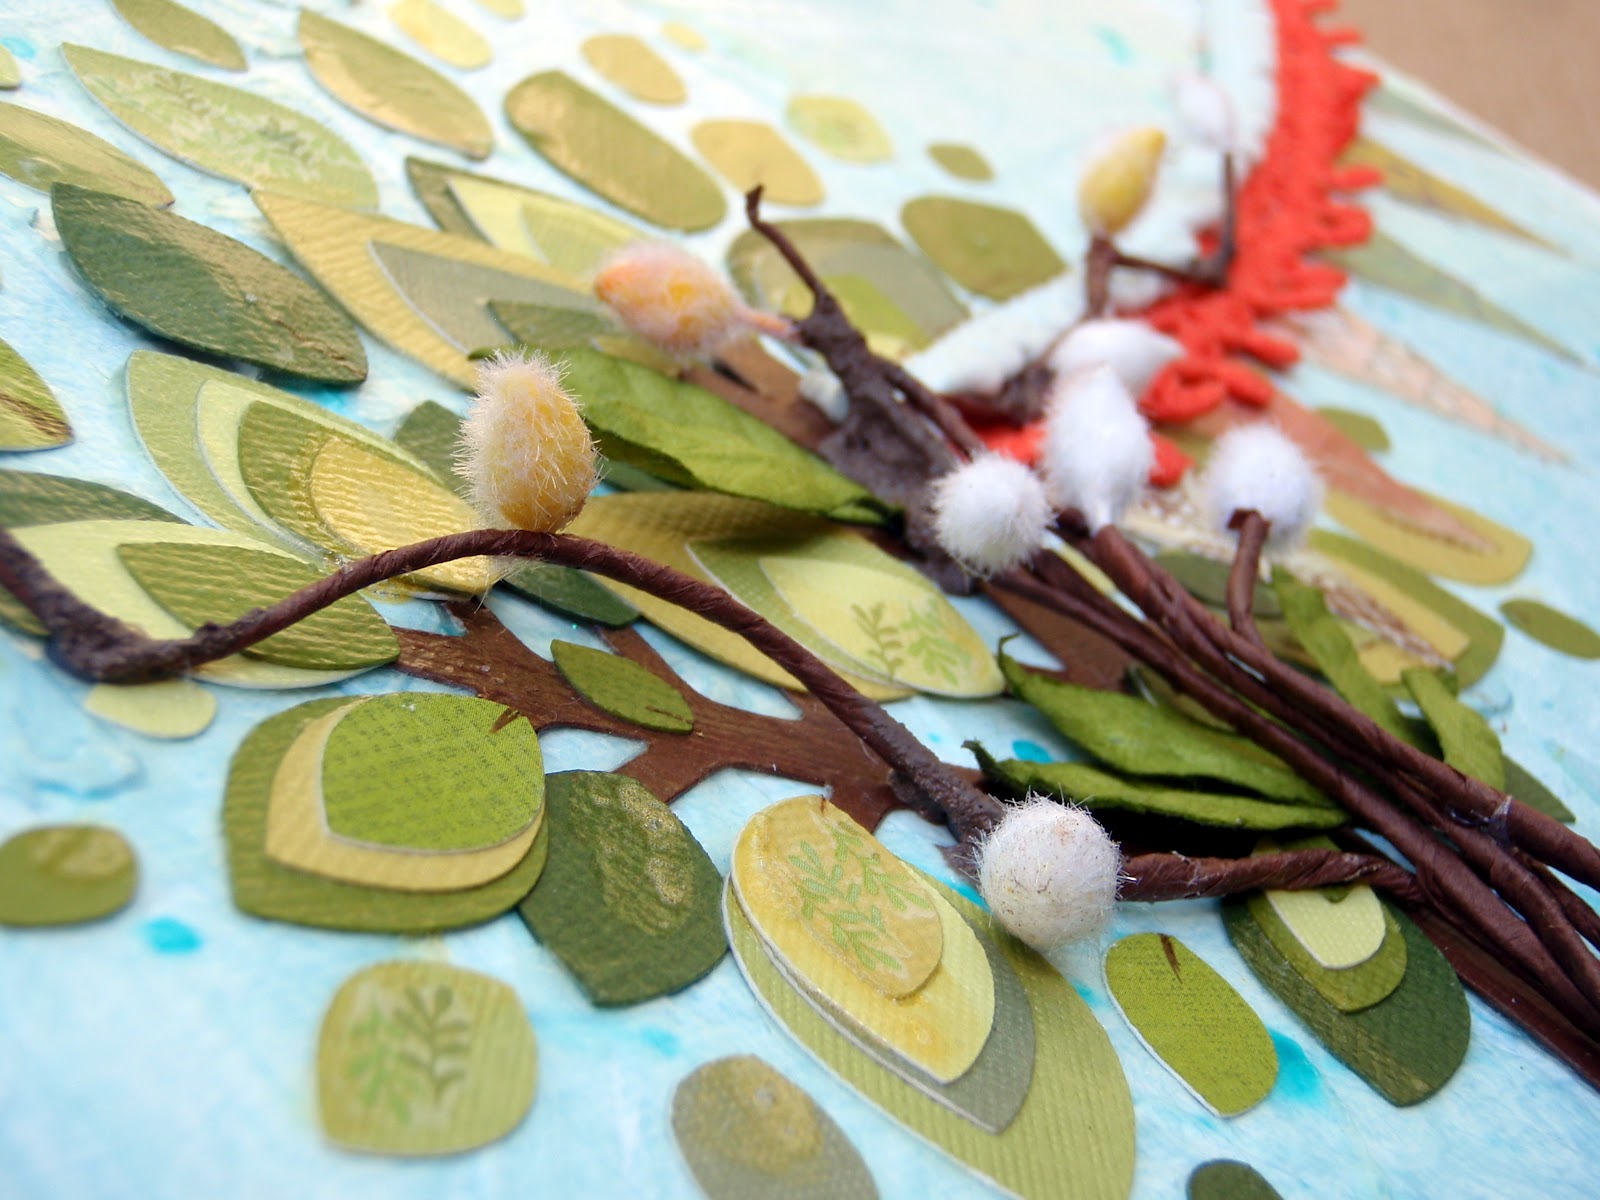
the dozens of leaves where all cricut and layered then mod-podged around the tree to create a more ethereal or abstract tree
on a super foggy day
right after it rains

first thing in the morning

well, that's it! thankx for checking it out!


July 11, 2012

A Star Is Born

with only 60 days left till my due date everything is going from push to shove, there's doc appointments every other week, childbirth classes, a breastfeeding class & what i'm really looking forward to is our maternity shoot! the good thing is the nursery walls have now been painted & the crib is finally set up! so its actually starting to look like a nursery.. the rest of the furniture is running late & i hope the glider & rug make it in time! pictures to come of all the progress later on when its a little more photo ready - meanwhile, i've been working on all kinds of nursery projects inculding my first mixed media canvas which i'm really excited to show off! but today i'm showing another completed  book waiting for Jr's arrival 
 
this collection (this & that) has been one of my favorites to work with i think to date! totally my colors & the textures are just out of this world fun! for the base of the album i use this star shape chip book which i bought at a garage sale for $1

personally, i think this button pretty much makes the cover - been holding onto it forever waiting for the right project. also you'll notice on the edges of the book all the texture which i used coarse texture gel by liquitex basics then using adirondack dabber in lettuce went over the dried texture. love the overall look for a 1st try

a canvas boarder, mo green pom poms + natural twine, lots of paper boarders & wood buttons - all make the details on the cover

here's all the pages - pretty simple really but i wanted to leave enough room for the pictures, journaling + embellishments which i plan on adding later on

the back cover with the repeated coarse texture treatment 
the end. simple but great to throw some cute photos i know i'm going to be capturing of Jr's firsts


June 14, 2012

Love, Live, Dreams ~ A Family Album


gosh the weather couldn't get much hotter! i've been getting in our pool on a somewhat regular basis because it releaves so much of the weight & pressure from my legs, feet & well, boobs - anyhow the moral of the story is this afternoon i went to get in the pool and it was darn near 100 degrees! needless to say i had eric turn off the solar - don't think we need that running anymore! ended up just taking a cool shower & making some flavored water which i'm calling a pregnant cocktail. they're fabulous!  found the recipe on pinterest check it out.. 

so far my favorite is the pineapple mint! its wonderful & refreshing! check out the recipe here

been doing tons of scrapping & a little behind on my pregnancy journal which i had planned on posting today however, i'm going to show you a book i finished last month - which i premade for a family photo shoot we going to have right after our little one is born. this whole book including how i made the base/binding itself was a complete & total experiment but with such a cute paper line - i knew it wouldn't turn out bad - ok, i'll stop talking - here it is

the binding was so simple and actually worked i couldn't believe it! what i did was ripped a metal 3 ring binder piece out of a old binder i was tossing away & cut grunge paper to fit - then using my new favorite tool score-it i scored 2 folds about an inch & a 1/4 apart & secured the metal binder in with brands.

 once the brads where in place i covered the outside with this muslin fabric tape (handmade by yours truly) and there you have it the easiest binding ever & ready to hold lots of pages!

for the the tabbed pages i used again more grunge paper since i was going to technique crazy out of them + the tabs themselves where a bit heavy & i was afraid cardstock would not be able to hold em. the black circle tabs are plastic vintage bingo chips i bought at a vintage shop a while back.   

all of the chips have a # and a letter & i chose these certain ones for a purpose/meaning

tab 1 (at bottom) is B 14 = positive pregnancy on the 14th of January
tab 2 is B 1 = our 1st baby together
tab 3 is B9 = length of pregnancy
tab 4 is N 34 = my age at delivery
tab 5 is I 17 = I am due on the 17th


this white flower i actually ordered a whole package online for my wedding layouts but this cover was screaming for a white flower to tone down all the coral & black! the kraft paper helps i think + the white bloomers create a soft feel which contrast all the textures.

every page has sewing some by hand some by machine (the zig zag stitch)  i think this is the book where my machine decided it didn't want to stich anymore - so currently its at the repair shop. hopfully it can be fixed poor dear, its so old. its the same machine my mom sewed my baby quilt on! 

the left page here (artsy/technique central) with a embossed right page
i just ran a little acrylic dapper over the embossing to help it stand out

misting & embossed font stamp

this left page is a bit of a collage. it has randomly placed scrap papers & stamping, inking, glitter, acrylic paint & a little misting cause after all the above why leave out some mist!

love the way the polka dot embossing turned out

so excited about all the punches i used to create all the fun edges but this notebook one is my favorite - maybe cause its newer but i just love the pattern! reminds me of being a kid again when i would rip out a notebook page to do homework

the right page is embossed but this photo doesn't pick it up very well. can you see the little heart diecuts i laid on the left page before i added the gesso? kinda looks ebossed - but its just an extra layer

i used more techniques & tools/supplies in this book then ever just as a experiment & i think it was pretty exciting to see how it all turned out what i liked using together & what i would change next time

on the back inside cover i stamp embossed these bright swirls and using a black archival pen doodled a couple more swirls to complete the pattern. 

just love the way it turned out! 

that's my latest mini album & can't wait to add all our family photos with the little new addition. Jr!

May 31, 2012

Sneak Peak Reveal #3

life has been super busy here in the krueger household. we've finally got in little man's crib and can't wait to set it up! i'm sure eventually i'll be scrapping about it & updating my pregnancy journal to fill ya'll in on all the fun & juicy details. there are several other crafty projects i'm working on for the nursery (of course) + i'm in the middle of no less than 8 mini books - seriously if there wasn't so many fabulous products out there i wouldn't have to keep starting new books/projects without finishing the last!! oh yeah i'm not taking the blame for this one.. its all those amazing manufacture's fault! you know who you are!! *wink

my cravings have changed quite a bit! thank the lord too cause i think my raisins lightly tossed in ranch dressing was starting to freak everyone out! :) now its all about cereal (any kind) in cold milk, chicken salad sandwich or wrap, & donuts i mean um... almonds (insert HUGE innocently given smile here!) no seriously this afternoon i had a cake doughnut with a massive glass of organic (of course) whole milk and my eyes where rolling around in my head! it was amazing! however, i really did want the chocolate doughnut.. but look this is how it is... my tummy is now up to 40" gosh did i just admit that?! Eek! so i'm trying to keep as healthy and stay as weight conscious as possible after all in about 3 months i'm going to have to lose these wonderful doughnut hips.. and that's not what i'm looking forward to! *sad face

well, enough talking let's get to another reveal don't ya think! this book is finally finished and i'm so excited to show it off! 

project #3

a Teresa Collins inspired bebe book which i hope to fill with pictures of our little guy once he arrives. yay for planning ahead!

the binding was a big issue with this book. i really couldn't decide for the life of me what color of rings i wanted to use however i knew i did want to use the bind-it-all. the choices where black, white & antique brass.
obviously i ended up using white although the other two looked really good as well from the cover stand point but the white went best with the whole book the inner pages + the cover.. so i made a special order, from my local scrap store, of the correct size & had to wait till it came in before i could finish the book and reveal it! hence the long wait

the fabric flowers are hand cut & rolled (by yours truly) 

the burlap one took a ton a glue - but turned out pretty well & i think will hold up on the cover

i've mentioned a couple times now (in previous posts) that i'm super huge into tabs right now & this book is no different i really mixed up my metals in this one & added silver tabs 
as you can see here the different metals actually work together really interestingly - well, i thought so anyway. the silver brad + antiqued brass + painted blue hold down thingy (sorry i honestly have no idea what they are called :) 

this blue chipboard piece on the left side (shown above) was originally white & i painted it then used a crackle finish around the edges & ends. my idea for this was to add his name maybe with some thickers or more chipboard letters 

 the above pocket is repeated throughout the book several times. thought it would be great to hold any type of sentimental note or memorabilia. all i did was cut a piece of double sided paper double the width than i wanted the pocket, then on the right side of the pocket using a 2" hole punch i cut out a half circle made a fold crease in the middle, added glue to the top & bottom only of one side and there ya have it a pocket made out of the paper in wanted!

 "the best things in life aren't things" 

 this in one of my favorite new techniques! i embossed this b then inked around it - to help show the texture of the paper - & the ink doesn't hold to the embossing.. ♥

 although this denim heart lends itself a little girlie i couldn't resist - just thought it was too cute in this book 

seeing cutouts used a lot these days & why not.. they're great! 

 a tool i can't get enough of... the Tim Holtz tiny attacher! i've used mine so many times - it broke.. but its still useable - haha maybe one day i'll break down & get another 

 i was very tempted to add pops of red while making this book & i have to admit i'm so glad i stuck to my original design of just black white blue & grey.. i normally don't go so monochromatic but for some reason a monochromatic color scheme lends itself in such a masculine way.

 really looking forward to seeing all the pictures in this one. my thought is black & white photos to really go with the color scheme.

our child is a boy. born a blessing. i smile when i think what a joy he is. i love him already & can't wait to hear his giggle. him growing in the family makes us all a little more perfect. - *what i wrote in the pocket to go with these words.
 
 inside back cover (might be my favorite page.. even more so than the cover!) tons of layers of papers & fabric i just couldn't stop adding to this one! 

 the boy chipboard i covered with the blk & white polka dot paper & stamped - not sure you can see very well in these pictures..

so that's my first of many Bebe boy books. my goal is to have quite a few ready for pictures cause i'm not sure just how much time i'm going to have for minis once mini man comes along! might have to start getting in to layouts more...
thanks for checking it out ~ R